Import Files
You can import data from your spatial data files by uploading them when adding or updating
a Dataset. Currently four file types are supported.
- CSV Files: Comma Separated Value files with headers, where the delimiter must be a comma.
- Zipped CSV Files: One or more CSV files zipped up into a ZIP file.
- KML Files KML files containing spatial features such as points, line strings and polygons
- KMZ Files KML files zipped up with the file extension KMZ.
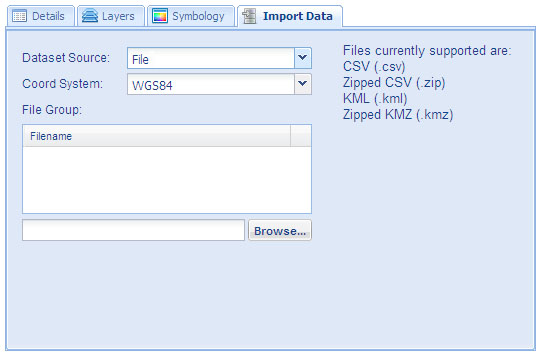
You can choose to upload files in the Import Data tab by selecting File from the Dataset Source drop
down box.
CSV Files
MapProvision supports the uploading of CSV files to add spatial data to your dataset.
CSV files must contain headers specifying which columns represent which attributes and
spatial information.
If your CSV data is point data then you must have a column for both latitude and longitude.
If your CSV file has KML type placemark data such as points, lines or polygons then this column must have the
header "geometry".
When specifying latitude and longitude column names the following column headers are acceptable: "Latitude",
"latitude", "Lat", "lat", "Longitude", "longitude", "Lng", "lng", "Lon", "lon", "Long" and "long". These
will all be recognized as latitude and longitude columns
If you are using data from another coordinate system then the column headers "Northing" and "Easting"
are also allowed to specify the latitude and longitude values.
The following shows a CSV file in notepad that is in an acceptable format for upload to MapProvision.
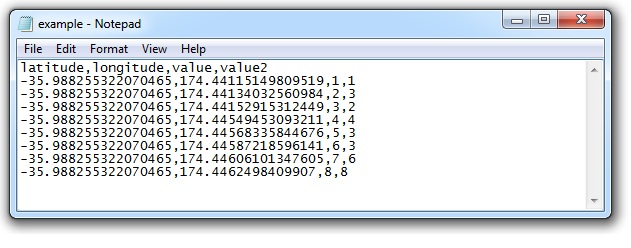
You can download a copy of this file here, or an example polygon file here.
The following shows a CSV file in notepad that is in an acceptable format for upload to
MapProvision using KML placemarks in a CSV file. Note KML placemarks must be in a column
called 'geometry'. Also note that the KML block must be surrounded with double quotes.
This is so the commmas in the KML do not confuse the uploader.

You can download a copy of this file here.
If you have fields in your data that contain double quotes the CSV convention is to surround the field's text with
double quotes and then use two double quotes for each embedded double quote in the string. This is shown in the
following example in bold:
latitude,longitude,description
-35.988255322070465,174.44115149809519,1,"<img src=""image.jpg""><p>"
This example data is perfectly valid and shows how to use double quotes in a CSV file's field.
Also not that there should always be a carriage return after the last line in the CSV file. This ensures that the last
record will be uploaded.
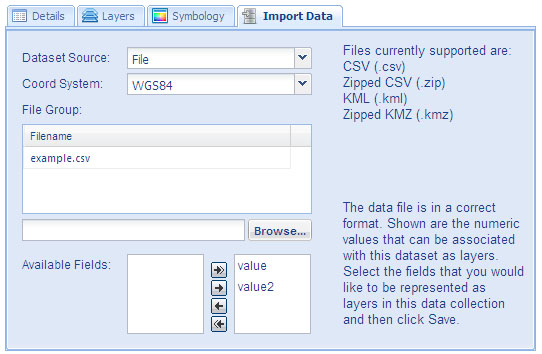
When the file has completed uploading it will be scanned to see what columns it contains. You will then
be prompted with a Layer Selection tool to select which columns you would like to be converted into spatial
layers. You can choose as many columns as you like and these will be turned into the layer types that
you specified in the Layer Selection tool. All attributes that have been determined to be numbers will
be automatically selected for you. Be careful specifying attributes that contain text as this is only
supported for use with the user defined image layers.
The filename of the uploaded file and all previously uploaded files will be shown in the File
Group grid and in the dataset's metadata. You can upload as many files as you want for each dataset.
You can update datasets and add new files by selecting the dataset in the dataset tree.
All columns in your file will be uploaded and created as part of adding
the current dataset, the column selection step is just to specify which columns you want to be displayed as
spatial layers.
You must take care to not have misplaced commas or quotes in your uploaded data as this may cause
problems for the importer to interpret your file. If you upload a file and it completes but you
are not prompted with the field selection tool in the form then double check your file to ensure
it is well formed. Loading it into a spreadsheet application may highlight any problems with the
formatting of the file.
When you have uploaded your data and are happy with the dataset details, layer selections, and
symbology. Click save to commit your dataset to your Data Collection.
If you have selected a User Defined icon set and you only have one column selected this column will be used
to create the image layer. If you have more than one column selected you will be prompted
to specify which column's attribute data is to be used to create the icon set layer with the
following pop up dialog box.
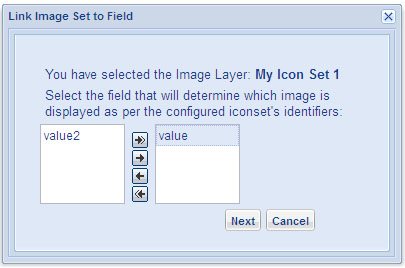
Select which attribute you want for all the user defined image datasets that you are prompted for by moving
only one attribute name into the right selection box.
KML Files
If you are importing from a KML file, attributes are taken from the
KML Extended Data tag as shown in the following example.
As with CSV file uploads you will be prompted by the Layer Selection tool to select which columns you would like to be converted into spatial
layers. You can choose as many columns as you like and these will be turned into the layer types that
you specified in the Layer Selection tool.
MapProvision is able to strip out the relevant spatial features from any KML file that is well formed XML.
<Placemark>
<name maxLines="1">1558</name>
<description></description>
<ExtendedData>
<Data name="attribute1">
<value>123</value>
</Data>
<Data name="attribute2">
<value>234</value>
</Data>
</ExtendedData>
<MultiGeometry>
<Point>
<coordinates> 175.016974,-36.945977</coordinates>
</Point>
</MultiGeometry>
</Placemark>
You do not have to have extended data in your KML files, but if you do not the only Layer Type that will
be relevant will be the Multi Geometry layer as all the other layer types require attributes to be associated
with the dataset's spatial features.
You can download a copy of an example KML file with points here.
File Sizes
Users on the Freemium plan have a file size limit of 6 MB. Pro users have a file size limit of 8 MB.
For best performance however it is encouraged to try to keep the size of each data set to less than 1-2 MB.
|